TABLE OF CONTENTS
1. Introduction: From Concepts to Configuration
In Part 1, we established the foundational principles of hardware-rooted security in IoT systems. We explored how Trusted Platform Modules (TPMs) provide immutable device identity through hardware-protected keys and measured boot, how Hardware Security Modules (HSMs) secure enterprise-scale cryptographic operations, and how PKCS #11 serves as the universal interface that allows applications to interact with both technologies using identical code. We examined the architectural differences between TPMs (device-level security) and HSMs (enterprise-level key management), and demonstrated how PKCS #11 URIs enable vendor-neutral, portable cryptographic operations.
Understanding these concepts is essential, but implementing them requires solving a practical challenge: how do you develop and test hardware security features without requiring TPM chips on every development machine?
This is where Part 2 bridges the gap between theory and practice. In this article, we’ll build the complete technical infrastructure that enables identical code to run seamlessly across development and production environments:
What You’ll Build:
- A SoftHSM development environment that emulates hardware security on standard laptops
- A production-ready TPM environment on actual IoT devices
- OpenSSL 3 configured with PKCS #11 providers for both environments
- Verified cryptographic operations that work identically in both setups
The Key Insight:
By leveraging PKCS #11 as a hardware abstraction layer, you’ll write security code once and deploy it everywhere, from your development laptop to production IoT devices, with only configuration file changes required. This solves the traditional development dilemma: maintaining separate codebases for testing and deployment.
By the end of Part 2, you’ll have a complete, portable infrastructure ready for production IoT security implementation, which we’ll complete in Part 3.
2. How PKCS #11 Connects TPMs and HSMs
The practical power of PKCS #11 becomes clear when you realize that both TPMs and HSMs can implement the same standard. This creates a symmetry:
Examples of common configurations:
| Environment | Hardware | PKCS #11 Module |
| Developer Laptop | SoftHSM v2 (emulated hardware) | /usr/lib/softhsm/libsofthsm2.so Installed as part of softhsm2 and libsofthsm2 packages |
| Edge IoT Device | TPM 2.0 chip | /usr/lib/libtpm2_pkcs11.soInstalled as part of libtpm2-pkcs11-1 |
| On-Premises Server | YubiHSM 2 (USB) | /opt/yubihsm/lib/libyubihsm_pkcs11.soCan be downloaded from YubiHSM technical support website |
| Cloud Backend | AWS CloudHSM | /opt/cloudhsm/lib/libcloudhsm_pkcs11.soCan be downloaded by link from AWS CloudHSM documentation |
The same OpenSSL commands, Greengrass configurations, or custom code work across all these environments. Only the PKCS #11 module path changes, a one-line configuration update.
This symmetry enables powerful deployment patterns:
- Developers write and test code against SoftHSM on their laptops
- CI/CD pipelines test against physical TPMs in a test lab
- Production deployments run against CloudHSM in the cloud
- A single codebase powers all three environments
Without PKCS #11, each environment would require custom integration code, testing would be fragmented, and production deployments would harbor untested code paths.
3. Security Benefits in Layered Architectures
When you integrate TPMs and HSMs into an IoT architecture, you gain multiple security properties that compound:
Key Non-Exportability
Private keys cannot be read, copied, or exported from the secure module, not even by administrators. Only cryptographic operations are allowed. If an attacker steals a device or cloud VM, the keys remain inaccessible. This is fundamentally different from file-based keys, which can be copied with filesystem access.
Hardware-Based Randomness
Key generation relies on the device’s hardware RNG, which produces entropy from physical phenomena (thermal noise, oscillator jitter). This is more trustworthy than software-based pseudo-random generators, which can be influenced by system state or predictable seeding.
Tamper-Aware Policy Enforcement
Access control logic (PINs, rate limits, operation quotas) runs in firmware inside the secure boundary. Attackers cannot bypass these policies even with kernel-level access. If an attacker attempts to force operations without proper authentication, the device responds, logging the incident, halting operations, or erasing keys.
Attestation and Non-Repudiation
Cryptographic operations can include proof of device identity and, when configured, firmware state. When an IoT device signs telemetry data, it can also attach a TPM-generated attestation quote proving “I am device XYZ with firmware version ABC.” The cloud system verifies both signatures and if attestation is present, the reported firmware version. Later, if a breach is suspected, you can audit which devices signed which data, with cryptographic proof.
Operational Audit Trails
HSMs and TPMs log every operation: who accessed what, when, and what was the outcome. This audit trail is stored in tamper-proof storage, creating an undoubted record for compliance investigations.
4. Real-World Example: Building an End-to-End Device Trust Chain
To make these concepts concrete, consider a practical IoT deployment:
Manufacturing Phase
Each edge controller is produced with a TPM 2.0 chip. During factory provisioning, the device’s Endorsement Key (EK) is extracted. The manufacturing service submits a Certificate Signing Request (CSR) to an enterprise Certificate Authority (CA) hosted on an HSM in a secure data center. The HSM signs the CSR and issues a device certificate, binding the device’s EK to its serial number.
Field Deployment
The device is shipped with its certificate installed in TPM non-volatile memory. Upon first boot, the device writes the hash of its firmware into PCRs, then connects to AWS IoT Core using mutual TLS. The device presents its certificate (signed by the enterprise CA); the cloud verifies the signature using the CA’s private key. Both sides confirm they’re communicating with authenticated partners.
One of the key things in this process is that mutual TLS is performed using the public key known to AWS Cloud through the device certificate, while the corresponding private key remains protected inside the TPM storage.
Runtime Operations
Throughout operation, the device uses its TPM to encrypt and decrypt data transferred over a network MQTT connection (sensor data, system events, and status messages, etc.). During the initial TLS handshake, the cloud verifies the device’s certificate and signatures, confirming the connection originates from an authenticated device. After that, all MQTT traffic is protected by the established TLS session. If a device’s PCRs indicate firmware tampering, the boot process halts, preventing non-compliant software from running, therefore, no messages are ever sent to the cloud from that device.
Key Rotation and Renewal
When the device certificate nears expiration, the device generates a new key inside its TPM and submits a CSR to the enterprise CA. The HSM signs the new certificate. The device transitions to the new key without ever exposing the private key outside the TPM.
This creates an unbroken chain of cryptographic trust from manufacturing through field operations: every identity verification, every data signature, every access decision is rooted in hardware that cannot be tampered with or cloned.
5. Operational Considerations
5.1 Provisioning Workflows
TPMs must be initialized during manufacturing or first boot. Initialization involves:
- Setting the TPM owner authorization (SO PIN)
- Creating a Storage Root Key (SRK)
- Generating application keys
- Issuing and installing device certificates
This is typically automated via manufacturing services and on-device provisioning agents. Cloud workflows (e.g. AWS Lambda functions, custom provisioning scripts) coordinate the process, while the agent on the device interacts with the TPM through standard APIs/tools ( tpm2-tools, PKCS #11). The provisioning process must be secure: if a provisioning server is compromised, all subsequently provisioned devices inherit that compromise.
5.2 Performance Implications
TPMs are optimized for security, not raw throughput. A typical RSA-2048 signature takes 100–200 ms on a TPM, whereas a software-based operation completes in milliseconds. This is acceptable for device authentication (which happens infrequently) but prohibitive for bulk signing operations.
For IoT deployments, the typical pattern is:
- Use TPM to sign connection setup and authentication flows (infrequent)
- For high-volume operations (bulk data signing, encryption), use symmetric keys stored in TPM but operated via software accelerators
HSMs, by contrast, handle thousands of operations per second and are suitable for enterprise PKI, certificate authority operations, and high-throughput signing pipelines.
5.3 Backup and Disaster Recovery
TPM:
Keys cannot be cloned from a TPM. If a TPM fails, the keys are lost. This requires careful planning: ensure devices have redundant TPMs, use key hierarchies that allow key regeneration, or employ multi-device redundancy where keys are distributed across multiple devices.
HSM:
Cloud HSM services support encrypted key export and multi-node clustering. Keys can be securely shared across multiple HSM instances for high availability. On-premises HSMs typically support key replication via secure channels.
6. Clarifying Common Misconceptions
Several myths persist in the hardware security space. Let’s address them:
“Hardware security is overkill for most IoT deployments”
In reality, hardware security costs have fallen dramatically. TPMs are standard components ($1-5 per device, often pre-installed), and CloudHSM pricing (approximately $1,200/month per instance) is minimal compared to compliance violation costs that easily reach millions. CloudHSM pricing is competitive with compliance risks. Any deployment with regulatory requirements (finance, healthcare, industrial control) benefits from hardware roots of trust.
“I must choose between TPM and HSM, they’re competing technologies”
False. TPM and HSM are complementary. TPMs secure individual devices; HSMs secure centralized services. Best practice is to deploy both.
“PKCS #11 is outdated and replaced by modern standards”
PKCS #11 is actively maintained by OASIS and continuously updated. Modern algorithms (ECC, EdDSA) are fully supported. The most commonly adopted v2.40 specification became approved by OASIS on 04/2015. The latest version is v3.1 approved on 07/2023. It remains the industry standard for cryptographic device interfaces.
“Hardware-backed keys require significant code changes”
With PKCS #11, changes are minimal. You update configuration (module path, PIN) and add URIs to specify key locations. Existing code using OpenSSL or standard crypto libraries works unchanged. Many platforms, AWS FreeRTOS include native PKCS#11 support out of the box, allowing applications to use hardware protected keys with no additional integration effort.
7. Future Outlook and Emerging Trends
The hardware security landscape is rapidly evolving:
Remote Attestation Frameworks
Standards like RATS (Remote Attestation Procedures) are standardizing how devices prove their state to distant cloud systems. Expect tighter integration between TPM attestation, cloud policy engines, and automated device provisioning.
Confidential Computing
Hardware enclaves (AWS Nitro Enclaves, Intel SGX, ARM TrustZone) extend hardware protection to virtualized workloads. The boundary between TPM-protected devices and enclave-protected cloud applications is blurring, enabling end-to-end cryptographic pipelines.
Standardized Cryptographic URIs
JSON Web Signatures (JWS) and other standards are incorporating PKCS #11 URIs, making hardware-backed cryptography a first-class citizen in modern API design.
Decentralized Identity (DID) on Hardware
Blockchain and decentralized identity frameworks increasingly leverage TPMs and HSMs for key management, bringing verifiable identity to peer-to-peer networks.
8. Bridging the Development-to-Production Gap
We established why hardware-rooted security matters: TPMs provide immutable device identity, HSMs centralize enterprise trust, and PKCS #11 offers a unified interface. But understanding the theory is only half the challenge.
The practical problem developers face: How do you build and test IoT applications that use hardware-backed cryptography without requiring physical TPM hardware on every development machine? And once built, how do you deploy the same code to production devices without rewriting security logic?
Most IoT projects encounter a painful development cycle:
- Local development uses software-based keys and mock security
- Integration testing requires physical hardware, slowing iteration
- Production deployment needs completely different code paths
- Debugging becomes environment-specific, with issues appearing only in production
This article solves that problem by demonstrating how PKCS #11 abstraction enables identical code to run across development (SoftHSM) and production (TPM) environments. You’ll build a complete solution: generating keys, provisioning AWS IoT certificates, establishing mTLS MQTT connections, and integrating with AWS IoT Greengrass, all using one codebase.
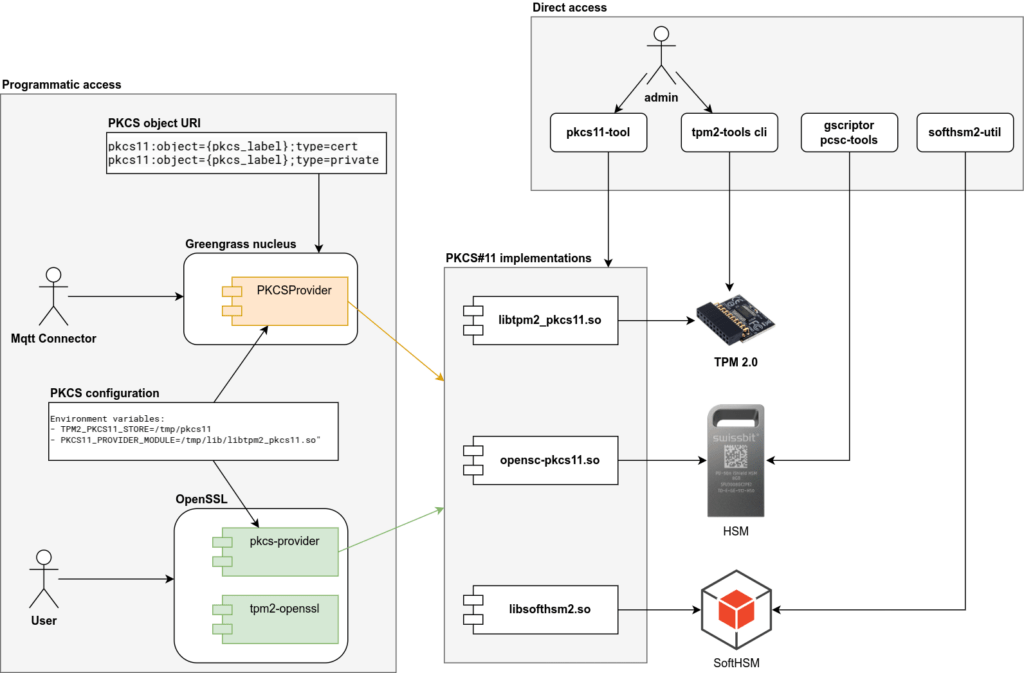
9. Solution Overview
Before implementing details, let’s visualize the layered architecture that connects hardware security to cloud services:
| Layer | Example Technology | Function |
| Hardware Trust Anchor | TPM 2.0, YubiHSM, Swissbit iShield | Generates and protects private keys within secure boundary |
| Middleware Interface | PKCS #11 library (libtpm2_pkcs11.so, libcloudhsm_pkcs11.so) | Standard C API for accessing hardware operations |
| Cryptographic Utilities Library | OpenSSL 3 Provider Framework | Translates high-level crypto calls into PKCS #11 operations |
| Application Runtime | AWS IoT Greengrass v2, Edge Components, MQTT client libraries | Uses hardware-backed keys for secure MQTT calls |
Each layer is independent yet integrated. The key principle: every signature, TLS handshake, or cryptographic operation involves hardware-protected keys rather than file-based secrets. If any layer is compromised, the keys remain protected behind the hardware boundary. By the end of this guide, you’ll have implemented a portable IoT security stack that works identically in development and production:
What makes this work:
The PKCS #11 standard provides a hardware-agnostic API. Your application references keys via PKCS#11 URIs like pkcs11:object=my-key;token=my-token. The underlying library (SoftHSM or TPM) handles the actual cryptographic operations, but your code remains unchanged.
The Six Steps
Step 1: Generate RSA Keypair
Create hardware-protected keys in both SoftHSM (development) and TPM (production) using tool specific commands.
Step 2: Provision AWS IoT Certificate
Generate a Certificate Signing Request (CSR) using OpenSSL with PKCS #11, submit to AWS IoT Core, and receive a device certificate, all without exposing private keys.
Step 3: Implement MQTT Client with mTLS
Initialize a MQTT client that establishes TLS connections to AWS IoT Core using hardware-backed keys, demonstrating code portability between environments.
Step 4: Configuration-Based Environment Switching
Show how changing a single configuration file switches between SoftHSM and TPM without code modification.
Step 5: Extend to AWS IoT Greengrass
Configure Greengrass to use TPM-backed certificates for device identity and secure component deployment.
Step 6: Verify End-to-End Security
Demonstrate that private keys never leave hardware boundaries while maintaining full cryptographic functionality.
These six steps represent our complete implementation journey. Steps 1-4 form the core of our hands-on work in this article, demonstrating portable security from key generation through environment switching. Steps 5-6 extend this foundation into production AWS IoT deployments, which we’ll cover in Part 3. Let’s begin by setting up our development environment.
10. Development Environment Setup
10.1 Prerequisites and System Requirements
Development machine:
- Ubuntu 24.04 LTS (or compatible Linux distribution)
- OpenSSL 3.0.x
- Python 3.11 (for MQTT client examples)
- AWS account with IoT Core access
IoT device (production):
- Hardware with TPM 2.0 chip (examples: Raspberry Pi with add-on TPM module, Intel NUC with integrated TPM, or industrial IoT gateways like Dell Edge Gateway 3000 series)
- Ubuntu 24.04 LTS (or compatible embedded Linux)
- Same software stack as development
Note: Command examples are provided for Ubuntu 24.04 LTS. Newer distributions may feature different package versions with slightly altered command-line arguments, as most tools are under active development and their functionality can change significantly. The following is a list of tool versions utilized at the time of article composition:
- opensc v0.25.0
- softhsm2 v2.6.1
- libsofthsm2 v2.6.1
- tpm2-tools v5.6
- libtpm2-pkcs11-1 v1.9.0
- libtpm2-pkcs11-tools v1.9.0
- openssl v3.0.13
- pkcs11-provider v0.3
- tpm2-openssl v1.2.0
10.2 Installing SoftHSM
Developers typically progress through three environments: local development, integrated testing, and production deployment. Each requires different hardware but should use identical PKCS #11 interfaces and application code.
SoftHSM is pure software that emulates a hardware security module in software, and stores keys on disk, making it unsuitable for production. But for development, it’s invaluable: your code and scripts work identically against SoftHSM, real TPMs, and CloudHSM thanks to PKCS#11abstraction.
Install SoftHSM and PKCS #11 tools:
sudo apt update
sudo apt install libsofthsm2 softhsm2 opensc - softhsm2 package contains cli tool for managing SoftHSM objects like keys and certificates
- libsofthsm2 package installs PKCS#11 implementation library (i.e. PKCS#11 module) for the SoftHSM tool
- opensc package installs PKCS#11 cli tool which allows invoke functions of PKCS#11 specification from command line.
Initialize SoftHSM Token
Let’s say our working directory will be /tmp/softhsm2_test
# create directory and navigate it
mkdir -p /tmp/softhsm2_test && cd /tmp/softhsm2_test
By default SoftHSM locates configuration in /etc/softhsm2.conf file. It can be changed by setting the environment variable. Lets use our custom configuration as practice. man softhsm2.conf command can be used to get more information about configuration file structure.
# fill configuration file with initial values
echo 'directories.tokendir = /tmp/softhsm2_test' > softhsm2_custom_config.conf
echo 'log.level = DEBUG' >> softhsm2_custom_config.conf

# verify contents of softhsm2_custom_config.conf configuration file
cat softhsm2_custom_config.conf

# point softhsm configuration environment variable to the file
export SOFTHSM2_CONF=/tmp/softhsm2_test/softhsm2_custom_config.conf
Now SoftHSM2 tool is ready to be used in our custom directory with our custom configuration. Let’s initialize our first token.
softhsm2-util --init-token --slot 0 --label "softhsm2-token"
# You'll be prompted to set SO and User PINs, as example enter 0000 for SO PIN and 1111 for User PIN
# alternatively –-so-pin and --pin parameters can be used. While for development purposes it is safe to pass pin as command line arguments, do not use such approach on production environment.

# verify token was created
softhsm2-util --show-slots
Expected output
Slot 783022741
   Slot info:
       Description:      SoftHSM slot ID 0x2eabfa95
       Manufacturer ID:  SoftHSM project
       Hardware version: 2.6
       Firmware version: 2.6
       Token present:    yes
   Token info:
       Manufacturer ID:  SoftHSM project
       Model:            SoftHSM v2
       Hardware version: 2.6
       Firmware version: 2.6
       Serial number:    6846f9df2eabfa95
       Initialized:      yes
       User PIN init.:   yes
       Label:            softhsm2-token
Parameters explained:
- –slot 0: Physical or logical slot number (should not to be confused with SlotID)
- –label “softhsm2-token”: Human-readable token name
- –so-pin: Security Officer PIN (administrative operations)
- –pin: User PIN (cryptographic operations)
Generate RSA Keypair
So now SoftHSM token is initialized and we can use PKCS#11 interface to operate on the token. It can be a program on any programming language, or, as in our case, command line utility pkcs11-tool from the opensc package. The tool implements functions of PKCS#11 specification and provides access to them using command line interface.
# locate PKCS#11 module (implementation library) for the SoftHSM2. The library was installed as part of libsofthsm2 package
find /usr/lib -name "libsofthsm2.so" | head -1

# generate RSA keypair with 4098 key length
pkcs11-tool --module /usr/lib/x86_64-linux-gnu/softhsm/libsofthsm2.so \
--login --pin 1111 \
--keypairgen --key-type rsa:4096 \
--label "mqtt-mtls-key-rsa" \
--token-label "softhsm2-token"
So here we use library file /usr/lib/x86_64-linux-gnu/softhsm/libsofthsm2.so which contains implementation of PKCS#11 specification for the SoftHSM2 tool. We use PKCS#11 functions and underlying implementation operates on real SoftHSM files.
You now have a private key object labeled mqtt-mtls-key-rsa in slot index 0 and slot id 829139366.
List objects to verify:
pkcs11-tool --module="/usr/lib/x86_64-linux-gnu/softhsm/libsofthsm2.so" --pin 1111 --token-label "softhsm2-token" --list-objects
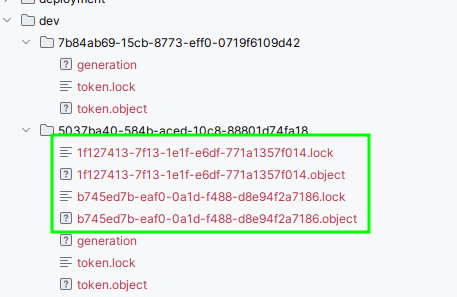
# view key object in SoftHSM2 working directory (the name of the directory will be different)
ls -la 33f7a494-c15b-25f4-5208-a978316ba9a610.3 Verify setup by creating digital signature of a file
Sign a File
Here is an example how a file can be digitally signed using PKCS#11 abstraction
echo "hello world" > data.txt

# sign the file
pkcs11-tool --module="/usr/lib/x86_64-linux-gnu/softhsm/libsofthsm2.so" \
 --pin 1111 --token-label "softhsm2-token" \
 --sign --mechanism SHA256-RSA-PKCS \
  --input-file data.txt \
  --output-file data.sig

# verify the signature
pkcs11-tool --module="/usr/lib/x86_64-linux-gnu/softhsm/libsofthsm2.so" \
  --pin 1111 --token-label "softhsm2-token" \
  --verify --mechanism SHA256-RSA-PKCS \
  --input-file data.txt --signature-file data.sig

# example if file is modified, then verify operation will fail
echo "hello world1" > data.txt

pkcs11-tool --module="/usr/lib/x86_64-linux-gnu/softhsm/libsofthsm2.so" \
  --pin 1111 --token-label "softhsm2-token" \
  --verify --mechanism SHA256-RSA-PKCS \
  --input-file data.txt --signature-file data.sig
This process mimics a hardware HSM, enabling integration testing before deploying to physical TPM or CloudHSM environments.
Why SoftHSM matters for your workflow:
Because SoftHSM exposes the same PKCS #11 interface as real hardware, you can develop and test your entire integration (OpenSSL commands, Greengrass configs, custom code) before touching real hardware. This reduces risk and accelerates development.
10.4 Configure OpenSSL 3 PKCS #11 Provider
Install openssl tool and pkcs#11 provider for it
sudo apt install openssl pkcs11-providerSet the environment variable pointing to the PKCS #11 module:
export PKCS11_PROVIDER_MODULE=/usr/lib/x86_64-linux-gnu/softhsm/libsofthsm2.soVerify OpenSSL recognizes the provider – verify signature of data.txt generated by pkcs11-tool using openssl tool with pkcs11 provider and pkcs11 uri as reference to public key in the softhsm2 token.
openssl dgst -sha256 -provider pkcs11 -provider default \
    -verify "pkcs11:object=mqtt-mtls-key-rsa;type=public;token=softhsm2-token?pin-value=1111" \
    -signature data.sig \
    data.txt
Expected output:
Verified OKWhy this matters: You’ve now configured a complete development environment where keys are stored in SoftHSM but accessed via the same PKCS #11 interface that production TPMs use. Any code you write here will work on real hardware.
11. IoT Device Environment Setup
11.1 Installing TPM Tools
On a device with TPM 2.0 hardware:
sudo apt install libtpm2-pkcs11-1 tpm2-abrmd tpm2-tools opensc \
libtpm2-pkcs11-tools pkcs11-provider tpm2-openssl openssl- tpm2-tools tpm2-abrmd – cli for managing TPM 2.0: configure authorization values, initialize storage root key, create keys
- libtpm2-pkcs11-1 libtpm2-pkcs11-tools – PKCS#11 implementation library for the TPM 2.0 and cli tool for managing TPM 2.0 via pkcs#11 interface
- opensc package installs PKCS#11 cli tool which allows invoke functions of PKCS#11 specification from command line.
- pkcs11-provider tpm2-openssl openssl – Openssl cli tool and providers for PKCS#11 and TPM 2.0 access.
Verify TPM Presence
sudo tpm2_getcap algorithmsIf you see output listing available TPM algorithms, your TPM is present and operational.
11.2 Initialize TPM owner hierarchy and Storage Root Key
Each object stored in TPM belongs to some hierarchy of objects. Owner hierarchy is commonly used for user needs. Each hierarchy must have a primary object which is used to protect all child objects in the hierarchy.
sudo tpm2_changeauth -c owner 9999
# create storage root key
sudo tpm2_createprimary -C owner -P 9999 -c primary.ctx

# persist key in TPM memory so it is remains available between reboots
sudo tpm2_evictcontrol -C owner -P 9999 -c primary.ctx
  > persistent-handle: 0x81000000
  > action: persisted
11.3 Generate RSA Keypair in TPM
sudo tpm2_create -C 0x81000000 -G rsa2048 -u rsa.key.pub -r rsa.key.priv -c key.ctx -f pem -o rsa.key.pub.pem

sudo tpm2_evictcontrol -C owner -P 9999 -c key.ctx
  > persistent-handle: 0x81000001

  > action: persisted
Critical difference from SoftHSM: This key is generated inside the TPM chip and cannot be exported. The private key never exists outside the hardware boundary.
11.4 Initialize TPM PKCS #11 Environment
mkdir -p /tmp/tmp2_test && cd /tmp/tmp2_test
export TPM2_PKCS11_STORE=/tmp/tmp2_test/
sudo -E tpm2_ptool init --primary-handle=0x81000000
  > action: Added
  > id: 1
This creates a local database mapping PKCS #11 operations to TPM commands. tpm2_pkcs11.sqlite3 PKCS#11 database file will be located in TPM2_PKCS11_STORE=/tmp/tmp2_test/
Create TPM-Backed Token and link TPM key
sudo -E tpm2_ptool addtoken --label "tpm-token" --pid 1 \
  --sopin "0000" --userpin "1111"

sudo -E tpm2_ptool link --label="tpm-token" --userpin="1111" --key-label="tpm-mqtt-mtls-key" rsa.key.priv rsa.key.pub
Compare PKCS #11 URI for SoftHSM and TPM tokens
# SoftHSM PKCS#11 URI
pkcs11:object=mqtt-mtls-key-rsa;type=public;token=softhsm2-token?pin-value=1111

# TPM PKCS#11 URI
pkcs11:object=tpm-mqtt-mtls-key;type=public;token=tpm-token?pin-value=1111
Structurally identical, only the token name differs. This is the foundation of code portability.
11.4 Verify setup by creating digital signature of a file
Here is an example how a file can be digitally signed using PKCS#11 abstraction and TPM 2.0 hardware. Please note how the code remains the same as for SoftHSM 2 version. Only parameters like module and slot are changing:
find /usr/lib -name "libtpm2_pkcs11.so" | head -1

echo "hello world" > data.txt
sudo -E pkcs11-tool --module="/usr/lib/x86_64-linux-gnu/pkcs11/libtpm2_pkcs11.so" \
 --pin 1111 --slot 1 \
 --sign --mechanism SHA256-RSA-PKCS \
  --input-file data.txt \
  --output-file data.sig

# verify the signature
sudo -E pkcs11-tool --module="/usr/lib/x86_64-linux-gnu/pkcs11/libtpm2_pkcs11.so" \
  --pin 1111 --slot 1 \
  --verify --mechanism SHA256-RSA-PKCS \
  --input-file data.txt --signature-file data.sig

# example if file is modified, then verify operation will fail
echo "hello world1" > data.txt

sudo -E pkcs11-tool --module="/usr/lib/x86_64-linux-gnu/pkcs11/libtpm2_pkcs11.so" \
  --pin 1111 --slot 1 \
  --verify --mechanism SHA256-RSA-PKCS \
  --input-file data.txt --signature-file data.sig
11.5 Configure OpenSSL 3 PKCS #11 Provider
Set the environment variable pointing to the PKCS #11 module:
export PKCS11_PROVIDER_MODULE=/usr/lib/x86_64-linux-gnu/pkcs11/libtpm2_pkcs11.soVerify OpenSSL recognizes the provider – verify signature of data.txt generated by pkcs11-tool using openssl tool with pkcs11 provider and pkcs11 uri as reference to public key in the TPM 2.0 token.
openssl dgst -sha256 \
  -provider pkcs11 -provider default -provider tpm2 \
  -verify "pkcs11:object=tpm-mqtt-mtls-key;type=public;token=tpm-token?pin-value=1111" \
  -signature data.sig \
  data.txt
The exact same OpenSSL commands you used with SoftHSM now work with TPM hardware.
12. Conclusion: Bridging Development and Production
The Development Dilemma Solved:
At the start of this article, we identified a critical challenge facing IoT developers: how do you build and test hardware security features without requiring TPM chips on every development machine? The traditional answer, maintaining separate codebases for development and production creates security gaps, delays iteration, and introduces environment-specific bugs that only surface after deployment.
What We’ve Built:
Throughout Part 2, we’ve constructed the complete technical foundation that solves this problem. You now have:
Dual Environment Setup:
- A fully configured SoftHSM development environment that emulates hardware security on standard laptops
- A production-ready TPM environment on actual IoT devices with identical tooling and interfaces
- OpenSSL 3 configured with PKCS #11 providers for both environments
Proven Portability:
- The same PKCS #11 URIs work across both SoftHSM and TPM with only configuration changes
- Digital signature operations execute identically in development and production
- No code modification required when transitioning between environments
Production-Ready Infrastructure:
- Complete TPM initialization with owner hierarchy and storage root keys
- Proper security boundaries with hardware-protected key generation
- Verified operation through practical signature examples
The Key Insight:
PKCS #11 isn’t just a cryptographic API, it’s an abstraction layer that fundamentally changes how you develop secure IoT systems. By standardizing the interface between your application and the underlying hardware, it enables true DevOps practices for embedded security: develop locally, test continuously, deploy confidently.
The Value of This Approach:
Your development team can now iterate rapidly using SoftHSM, writing and testing cryptographic operations on their laptops. Integration tests can validate against physical TPMs in a lab environment. Production deployments use the exact same code, with only configuration files changing to point to actual TPM hardware. This eliminates entire classes of deployment bugs while dramatically accelerating development cycles.
Testing Your Infrastructure:
Before moving to production implementation, you’ve now verified that both environments work correctly. You’ve generated keys, created digital signatures, and confirmed that OpenSSL can interact with both SoftHSM and TPM through the same PKCS #11 interface. This validation step is crucial ,it proves your infrastructure is production-ready and your code will work reliably when you deploy to actual IoT devices.
What’s Next:
With both environments configured and verified, you’re ready to implement the complete IoT security stack. In Part 3, we’ll build the full solution: provisioning AWS IoT certificates using hardware-backed keys, establishing mTLS MQTT connections with TPM-protected credentials, integrating AWS IoT Greengrass, and implementing end-to-end security verification. You’ll see how certificate signing requests never expose private keys, how TLS handshakes leverage hardware cryptography, and how the same portable code secures thousands of devices in production. The infrastructure you’ve built in Part 2 becomes the foundation for production-grade, scalable IoT security.
By Mohammad Shirazi, Portfolio Manager, Klika Tech and Maxim Maltsev, Edge Computing Solution Architect, Klika Tech