TABLE OF CONTENTS
Introduction: Putting It All Together
In Part 1, we explored the foundational architecture of hardware-rooted security, understanding how TPMs anchor device identity, how HSMs secure enterprise cryptographic operations, and how PKCS #11 provides the universal interface that makes both accessible through vendor-neutral APIs.
In Part 2, we built the complete technical foundation: setting up both development (SoftHSM) and production (TPM) environments, configuring OpenSSL with PKCS #11 providers, and demonstrating how the same application code can seamlessly operate across different hardware platforms through configuration alone.
Now, in Part 3, comes the payoff: implementing a complete, production-ready IoT security solution.
What You’ll Implement:
- Certificate Provisioning: Generate CSRs using hardware-backed keys that never leave the TPM, then obtain AWS IoT certificates
- Secure MQTT Communication: Establish mTLS connections to AWS IoT Core using TPM-protected credentials
- AWS IoT Greengrass Integration: Configure Greengrass to use PKCS #11 provider for establishing hardware-backed device identity
- End-to-End Verification: Validate that private keys remain within hardware boundaries throughout the entire workflow
- Production Troubleshooting: Navigate common deployment challenges with practical solutions
The Complete Workflow:
By the end of this article, you’ll have a working system where devices authenticate to AWS IoT Core using hardware-protected keys, establish encrypted MQTT connections, and run Greengrass workloads, all while maintaining the same portable codebase you developed in Part 2. This is hardware-rooted security in action.
Let’s build it.
Certificate Provisioning with PKCS#11
2.1 Understanding the Provisioning Flow
To connect to AWS IoT Core, each device needs:
- Private key (stored in SoftHSM/TPM)
- X.509 Certificate (issued by AWS IoT Core)
- AmazonRootCA certificate for mutual authentication.
The challenge: acquire a certificate from the AWS IoT without exposing private key.
Solution: Use Certificate Signing Request (CSR)
Quote https://en.wikipedia.org/wiki/Certificate_signing_request:
“The CSR contains information identifying the applicant (such as a distinguished name), the public key chosen by the applicant, and possibly further information. When using the PKCS #10 format, the request must be self-signed using the applicant’s private key, which provides proof of possession (POP) of the private key but limits the use of this format to keys that can be used for (some form of) signing.”
2.2 Generate CSR Using OpenSSL + PKCS#11
Command (works for BOTH SoftHSM and TPM): the difference is only in -key parameter containing PKCS#11 URI of the private key. Please also keep in mind that for the openssl tool the path of the PKCS#11 implementation library is set via PKCS11_PROVIDER_MODULE environment variable – it will differ for SoftHSM2 and TPM 2.0 implementations.
# SOFTHSM2
export PKCS11_PROVIDER_MODULE=/usr/lib/x86_64-linux-gnu/softhsm/libsofthsm2.so
openssl req -provider pkcs11 -provider default \
  -sha256 -new \
  -subj "/C=US/ST=California/L=San Francisco/O=MyCompany/CN=MyProduct" \
  -key "pkcs11:object=mqtt-mtls-key-rsa;type=private;token=softhsm2-token?pin-value=1111" \
  -out aws_iot_mqtt.csr

#TPM 2
export PKCS11_PROVIDER_MODULE=/usr/lib/x86_64-linux-gnu/pkcs11/libtpm2_pkcs11.so
openssl req -provider pkcs11 -provider default -provider tpm2 \
  -sha256 -new \
  -subj "/C=US/ST=California/L=San Francisco/O=MyCompany/CN=MyProduct" \
  -key "pkcs11:object=tpm-mqtt-mtls-key;type=private;token=tpm-token?pin-value=1111" \
  -out aws_iot_mqtt.csr
Verify contents of the generated CSR file
openssl req -text -in aws_iot_mqtt.csrWhat happens:
- OpenSSL loads the PKCS #11 provider
- Parses the URI to locate the key in hardware
- Requests a signature operation from SoftHSM/TPM
- Hardware performs the signature using the sealed private key
- OpenSSL assembles the CSR with the signature
- CSR is written to aws_iot_mqtt.csr
Critical security property: The private key never enters OpenSSL’s memory. Only the signature result crosses the hardware boundary.
2.3 Submit CSR to AWS IoT Core
This section includes:
- Create certificate from CSR in AWS IoT Core using AWS CLI
- Create and attach certificate policy
Create certificate from CSR using AWS CLI
aws iot create-certificate-from-csr --certificate-signing-request=file://aws_iot_mqtt.csrOutput of the command will be following
{
    "certificateArn":"<redacted>",
    "certificateId": "<redacted>",
    "certificatePem": "<redacted>"
}
Save certificatePem to file, and use certificateArn to attach policy to certificate
Create json file containing certificate policy statement
Replace <AWS_REGION> and <AWS_ACCOUNT> placeholders. The policy allows
- Connect to AWS IoT Core using mqtt-mtls-pkcs-test-client clientID
- Publish messages to mqtt-mtls-pkcs-test-topic/req topic
Subscribe and receive mqtt-mtls-pkcs-test-topic/resp
{
    "Version": "2012-10-17",
    "Statement": [
        {
            "Effect": "Allow",
            "Action": "iot:Connect",
            "Resource": "arn:aws:iot:<AWS_REGION>:<ACCOUNT_ID>:client/mqtt-mtls-pkcs-test-client"
        },
        {
            "Effect": "Allow",
            "Action": [
                "iot:Receive",
                "iot:Publish"
            ],
            "Resource": [
                "arn:aws:iot:<AWS_REGION>:<ACCOUNT_ID>:topic/mqtt-mtls-pkcs-test-topic/req"
            ]
        },
        {
            "Effect": "Allow",
            "Action": "iot:Subscribe",
            "Resource": [
                "arn:aws:iot:<AWS_REGION>:<ACCOUNT_ID>:topic/mqtt-mtls-pkcs-test-topic/resp"
            ]
        }
    ]
}
Create policy and attach to certificate
aws iot create-policy --policy-name "mqtt-mtls-pkcs11-test-policy" --policy-document=file://certificate_policy.json

aws iot attach-policy --policy-name mqtt-mtls-pkcs11-test-policy --target "<your_certificate_arn>"

aws iot update-certificate --certificate-id "<your_certificate_id>" --new-status "ACTIVE"
MQTT Client Implementation with mTLS
3.1 Understanding mTLS with Hardware Keys
AWS IoT Core requires mutual TLS (mTLS) authentication:
- Server authentication: Device verifies AWS IoT Core’s certificate
- Client authentication: AWS IoT Core verifies device’s certificate
The device must present its certificate and prove it holds the corresponding private key by performing TLS handshake signatures, all without exposing the key.
3.2 MQTT Client with PKCS#11-Backed TLS
Prepare your python virtual environment. Make sure you have python 3.11 installed as well as pip
python -m venv venv
source venv/bin/activate

pip install awsiotsdk==1.19.0
pip install awscrt==0.19.1
Create file mqtt_test.pyReplace <redacted> placeholder to your specific values
import logging
import json
import time
import awscrt
from awscrt import mqtt
from awsiot import iotidentity, mqtt_connection_builder

logger = logging.getLogger(__name__)


def init_mqtt_connection(mqtt_iot_endpoint: str,
                         mqtt_iot_port: int,
                         amazon_root_ca: str,
                         mqtt_client_id: str,
                         pkcs11_module_name: str,
                         pkcs11_token_name: str | None,
                         pkcs11_private_key_label: str,
                         cert_file_path: str,
                         pkcs11_user_pin: str) -> mqtt.Connection:

    _mqtt_connection = mqtt_connection_builder.mtls_with_pkcs11(
            endpoint=mqtt_iot_endpoint,
            port=mqtt_iot_port,
            pkcs11_lib=awscrt.io.Pkcs11Lib(file=pkcs11_module_name),
            token_label=pkcs11_token_name,
            private_key_label=pkcs11_private_key_label,
            cert_filepath=cert_file_path,
            user_pin=pkcs11_user_pin,
            ca_filepath=amazon_root_ca,
            client_id=mqtt_client_id,
            on_connection_interrupted=_on_connection_interrupted,
            on_connection_resumed=_on_connection_resumed,
            clean_session=False,
            keep_alive_secs=30)
    logger.info("Connecting to %s with client_id: %s...", mqtt_iot_endpoint, mqtt_client_id)
    connected_future = _mqtt_connection.connect()

    # Wait for connection to be fully established.
    # Note that it's not necessary to wait, commands issued to the
    # mqtt_connection before its fully connected will simply be queued.
    # But this sample waits here so it's obvious when a connection
    # fails or succeeds.
    connected_future.result()
    logger.info("Successfully connected to mqtt endpoint")

    return _mqtt_connection

# Callback when connection is accidentally lost.
def _on_connection_interrupted(self, connection, error, **kwargs):
    logger.error("Connection interrupted. error: {}")
    print("Connection interrupted. error: {}".format(error))

# Callback when an interrupted connection is re-established.
def _on_connection_resumed(self, connection, return_code, session_present, **kwargs):
    print("Connection resumed. return_code: {} session_present: {}".format(return_code, session_present))

    if return_code == mqtt.ConnectReturnCode.ACCEPTED and not session_present:
        print("Session did not persist. Resubscribing to existing topics...")
        resubscribe_future, _ = connection.resubscribe_existing_topics()

        # Cannot synchronously wait for resubscribe result because we're on the connection's event-loop thread,
        # evaluate result with a callback instead.
        resubscribe_future.add_done_callback(self._on_resubscribe_complete)

def send_sample_message(mqtt_connection: mqtt.Connection):
    logger.info("Publishing sample mqtt request..")

    request_topic = f"mqtt-mtls-pkcs-test-topic/req"
    message = json.dumps({
        "message": "Hello from MQTT over PKCS#11!",
        "messageTs": int(time.time())
    })
    publish_future, _ = mqtt_connection.publish(request_topic, payload=message, qos=mqtt.QoS.AT_MOST_ONCE)
    publish_future.result()
    logger.info("Published sample mqtt request..")

def main():

    mqtt_connection = init_mqtt_connection(
        "<redacted>.iot.<redacted>.amazonaws.com", # # Get your AWS IoT endpoint: aws iot describe-endpoint --endpoint-type iot:Data-ATS
        8883,
        "/tmp/softhsm2_test/AmazonRootCA1.pem", # Download: curl -o AmazonRootCA1.pem https://www.amazontrust.com/repository/AmazonRootCA1.pem
        "mqtt-mtls-pkcs-test-client",
        "/usr/lib/x86_64-linux-gnu/softhsm/libsofthsm2.so",
        "softhsm2-token",
        "mqtt-mtls-key-rsa",
        "/tmp/softhsm2_test/mqtt_mtls_cert.pem",
        "1111"
    )

    send_sample_message(mqtt_connection)

if __name__ == "__main__":
    main()
3.3 Configuration-Based Environment Switching
The key to portability is externalizing hardware-specific parameters to configuration. The code of the script remains the same. We change only configuration parameters to switch between SoftHSM2 and TPM 2.0:
Sample configuration for our development Softhsm2 setup:
def main():

    mqtt_connection = init_mqtt_connection(
        "<redacted>.iot.<redacted>.amazonaws.com",
        8883,
        "/tmp/softhsm2_test/AmazonRootCA1.pem",
        "mqtt-mtls-pkcs-test-client",
        "/usr/lib/x86_64-linux-gnu/softhsm/libsofthsm2.so",
        "softhsm2-token",
        "mqtt-mtls-key-rsa",
        "/tmp/softhsm2_test/mqtt_mtls_cert.pem",
        "1111"
    )
Sample configuration for out TPM 2.0. setup:
def main():

    mqtt_connection = init_mqtt_connection(
        "<redacted>.iot.<redacted>.amazonaws.com",
        8883,
        "/tmp/tmp2_test/AmazonRootCA1.pem",
        "mqtt-mtls-pkcs-test-client",
        "/usr/lib/x86_64-linux-gnu/pkcs11/libtpm2_pkcs11.so",
        "tpm-token",
        "tpm-mqtt-mtls-key",
        "/tmp/tmp2_test/mqtt_mtls_cert.pem",
        "1111"
    )
Application code:
def send_sample_message(mqtt_connection: mqtt.Connection):
    logger.info("Publishing sample mqtt request..")

    request_topic = "mqtt-mtls-pkcs-test-topic/req"
    message = json.dumps({
        "message": "Hello from MQTT over PKCS#11!",
        "messageTs": int(time.time())
    })
    publish_future, _ = mqtt_connection.publish(request_topic, payload=message, qos=mqtt.QoS.AT_MOST_ONCE)
    publish_future.result()
    logger.info("Published sample mqtt request..")
Key insight: Zero code changes between environments. The PKCS#11 abstraction layer handles the hardware differences transparently.
3.4 Testing the Connection
We will use the AWS MQTT test client to check that our message reaches the AWS.
1. Go to AWS Console -> AWS IoT Core -> MQTT test client2. Subscribe to topic mqtt-mtls-pkcs-test-topic/req
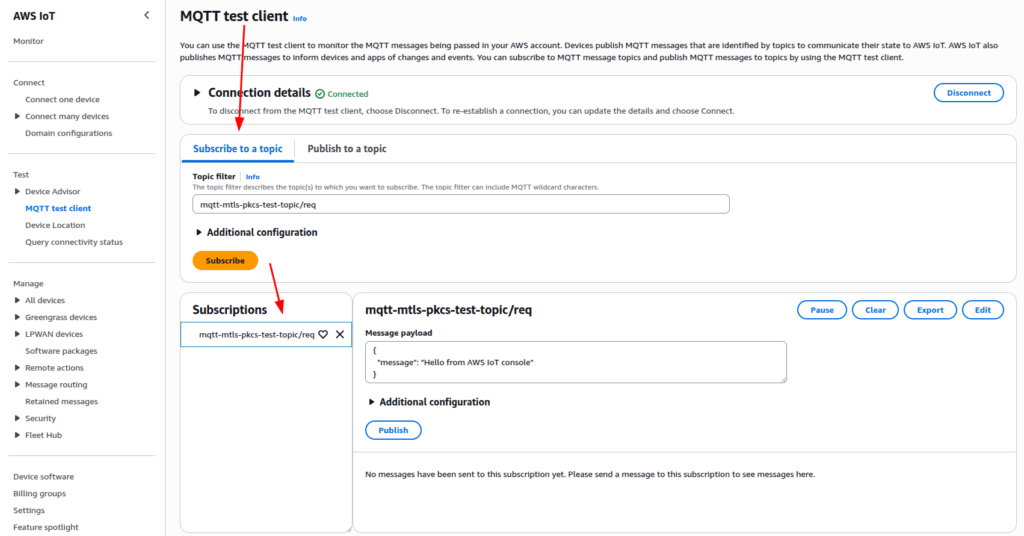
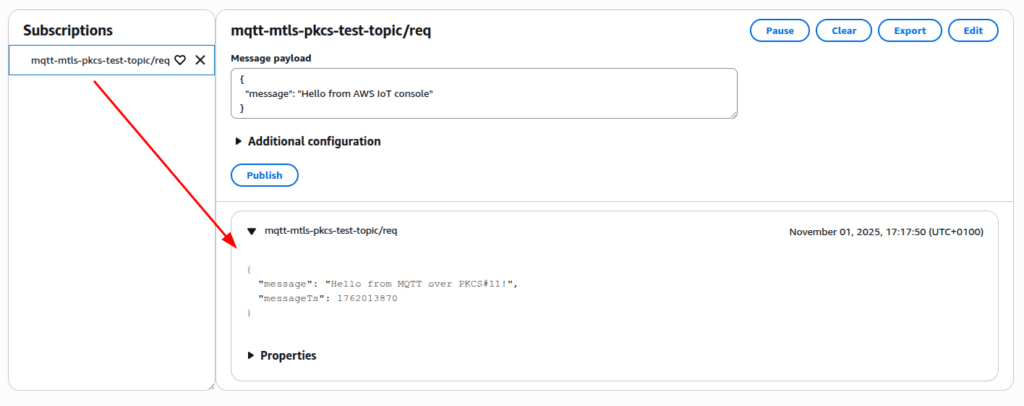
3. Run the script from command line
python3 mqtt_test.py4. Check that message is received by AWS IoT Core
AWS IoT Greengrass Integration
4.1 Why Greengrass with TPM-Backed Identity
AWS IoT Greengrass extends cloud capabilities to edge devices, running local compute, messaging, and data processing. By default, Greengrass stores device credentials on disk.
The security improvement: Configure Greengrass to use TPM-backed keys so that even if the filesystem is compromised, device identity remains protected.
The AWS Greengrass Nucleus integrates with the PKCS#11 specification via its PKCS#11 provider component. This integration facilitates the establishment of a secure MQTT connection with the cloud, with the private key being stored within the hardware module.
4.2 Greengrass Configuration with PKCS#11
Create/edit greengrass configuration at /etc/greengrass/config.yaml:
Add services.aws.greengrass.crypto.Pkcs11Provider configuration entry specifying PKCS#11 implementation library path and authentication information.Specify PKCS#11 URI of private key object in system configuration entry.
services:
  aws.greengrass.Nucleus:
    componentType: NUCLEUS
    configuration:
      awsRegion: <redacted>
      iotCredEndpoint: <redacted>
      iotDataEndpoint: <redacted>
      iotRoleAlias: <redacted>
    version: 2.14.1
  aws.greengrass.crypto.Pkcs11Provider:
    configuration:
      name: "tpm2_pkcs11"
      library: "/usr/lib/x86_64-linux-gnu/pkcs11/libtpm2_pkcs11.so"
      slot: 1
      userPin: "1111"
system:
  certificateFilePath: "/tmp/tmp2_test/mqtt_mtls_cert.pem"
  privateKeyPath: "pkcs11:object=tpm-mqtt-mtls-key;type=private;token=tpm-token"
  rootCaPath: /tmp/tmp2_test/AmazonRootCA1.pem
  rootpath: /greengrass/v2
  thingName: <redacted>
Note: To obtain these configuration values:
- awsRegion: Your AWS region (e.g., us-east-1, eu-west-1)
- iotCredEndpoint: Run aws iot describe-endpoint –endpoint-type iot:CredentialProvider
- iotDataEndpoint: Run aws iot describe-endpoint –endpoint-type iot:Data-ATS
- iotRoleAlias: The IAM role alias created for your IoT device (must be created beforehand)
For detailed instructions on setting up AWS IoT Greengrass with these values, see the official AWS documentation: https://docs.aws.amazon.com/greengrass/v2/developerguide/configure-greengrass-core-v2.html
Run AWS Greengrass Nucleus passing the PKCS#11 Provider component as trusted plugin. Assuming that you downloaded the AWS Greengrass Nucleus installer and PKCS#11 Provider component jars to /opt/greengrass directory and stored the config.yaml file in /etc/greengrass directory
java -Droot=/greengrass/v2 \
  -Dlog.store=FILE -Dlog.level=INFO \
  -jar /opt/greengrass/lib/Greengrass.jar \
  --aws-region <redacted> \
  --start false \
  --init-config "/etc/greengrass/config.yaml" \
  --trusted-plugin /opt/greengrass/lib/aws.greengrass.crypto.Pkcs11Provider.jar"
Please note that TPM2_PKCS11_STORE environment variable must be present and point to PKCS#11 store (e.g. tpm2_pkcs11.sqlite3 file)
4.3 Greengrass Startup with Hardware Keys
When Greengrass starts:
- Loads the PKCS #11 module (libtpm2_pkcs11.so)
- Connects to the TPM via the specified token
- Refers the private key using the PKCS #11 URI
- Reads the certificate from filesystem
- Establishes mTLS connection to AWS IoT Core
- Begins running deployed components
Security Verification and Best Practices
5.1 Verify That Private Key Never Leaves Hardware
Test with SoftHSM:
# Try to export the private key (should fail)
pkcs11-tool --module="/usr/lib/x86_64-linux-gnu/softhsm/libsofthsm2.so" \
 --pin 1111 --token-label "softhsm2-token" \
 --read-object --type privkey --label "mqtt-mtls-key-rsa"
Expected: Error indicating the key is non-exportable or only signature operations are allowed.
sorry, reading private keys not (yet) supportedTest with TPM:
pkcs11-tool --module="/usr/lib/x86_64-linux-gnu/pkcs11/libtpm2_pkcs11.so" \
  --pin 1111 --token-label "tpm-token" \
  --read-object --type privkey --label "tpm-mqtt-mtls-key"

    > sorry, reading private keys not (yet) supported
–--
tpm2_getcap handles-persistent

    > - 0x81000000
    > - 0x81000001

tpm2_readpublic -c 0x81000001
Expected: Only public key information is readable. The private key remains sealed.
5.2 Operational Best Practices
TPM 2.0 Authentication
This article utilized password authentication for the TPM 2.0 to maintain simplicity. However, more secure methods exist, including HMAC authentication and access policies contingent on PRC values.
PIN Management:
- Never hardcode PINs in source code
- Use environment variables or secure key management systems
- Rotate PINs periodically (every 90-180 days)
Certificate Lifecycle:
- Automate certificate renewal before expiration
- Implement monitoring for certificate validity
- Maintain certificate revocation lists (CRLs)
Development Workflow:
- Develop and test with SoftHSM
- Integration test with physical TPM in lab
- Deploy to production with identical code
- Monitor CloudWatch for connection/authentication issues
Logging and Monitoring:
- Enable CloudWatch Logs for IoT Core connections
- Monitor certificate expiration dates
- Track failed authentication attempts
- Correlate device logs with cloud events
Complete End-to-End Verification
6.1 The Full Workflow
Let’s trace a message from AWS IoT Core to device, showing hardware protection at every step:
Step 1: AWS Cloud and device establish mTLS secured MQTT connection.
During the TLS handshake, the device and AWS IoT Core authenticate each other using their certificates (public keys). The device presents its certificate signed by your enterprise CA, and AWS presents its certificate signed by AmazonRootCA1. After mutual authentication succeeds, both parties use the Diffie-Hellman key exchange protocol to establish a shared symmetric session key. This symmetric key is then used to encrypt all MQTT messages transmitted between the device and the cloud. The private keys in the TPM and on AWS are used only for:
- Authentication during the TLS handshake (signing operations)
- Key exchange operations (establishing the symmetric session key)
The actual message encryption uses symmetric cryptography (AES) with the session key.
Step 2: AWS Cloud generates response for the device
{"requestId": “111-222-333”, "requestTs": 1762072467, "statusCode": "200"}Step 3: AWS IoT Core validates the device
The AWS IoT Core validates the device’s identity:
- Verifies the device certificate is valid and signed by a trusted CA
- Confirms the device possesses the corresponding private key (via TLS handshake signature)
- Establishes a symmetric encryption key through Diffie-Hellman key exchange
- All subsequent MQTT messages are encrypted using this symmetric session key (not asymmetric encryption)
Behind the scenes:
- During the initial TLS handshake, the TLS library requires the private key for authentication and key exchange operations (not message decryption).
- The PKCS #11 provider directs these cryptographic operations (signing, key agreement) to the TPM.
- The TPM executes these operations within its secure boundary, helping establish the symmetric session key.
- Once the TLS session is established, all MQTT messages are encrypted/decrypted using the symmetric session key in software (not in the TPM).
- The private key in the TPM is used only during the TLS handshake, not for ongoing message encryption/decryption.
- The critical security property: the TPM’s private key never leaves the hardware boundary, even though the session key (which is ephemeral and rotated) is used in software.
Step 4: Audit trail
- CloudWatch logs connection
- CloudTrail records IoT Core API calls
- Device logs confirm successful publish
6.2 What We’ve Achieved
Security Properties:
- Private keys never leave hardware (SoftHSM in development environment, TPM in production environment)
- All TLS operations use hardware-backed encryption
- Device identity cannot be cloned or exported
- Compromise of one device doesn’t affect others
Operational Benefits:
- Single codebase for development and production
- Configuration-based environment switching
- Simplified testing and debugging
- Reduced development cycle time
Compliance:
- Keys stored in tamper-resistant hardware
- Complete audit trail of cryptographic operations
- Meets requirements for FIPS, ISO 27001, IEC 62443
Troubleshooting Common Issues
Issue: CKR_TOKEN_NOT_PRESENT
Symptoms: Application cannot find PKCS #11 token
Causes:
- Incorrect module path in configuration
- Token not initialized
- TPM not recognized by system
- Environment variable TPM2_PKCS11_STORE is not set
Resolution:
# Verify module exists
find /usr/lib -name "libtpm2_pkcs11.so" | head -1

# List available slots
pkcs11-tool --module /usr/lib/x86_64-linux-gnu/pkcs11/libtpm2_pkcs11.so --list-slots

# For TPM, verify hardware
sudo tpm2_getcap handles-persistent
Issue: TLS Handshake Failure
Symptoms: MQTT client cannot connect to AWS IoT Core
Causes:
- Certificate not properly provisioned in AWS
- Clock skew on device
- Wrong IoT endpoint
- Certificate/key mismatch
Resolution:
# Verify certificate is active in AWS IoT Core
aws iot describe-certificate --certificate-id <cert-id>

# Check system time
timedatectl status

# Test connection with openssl
openssl s_client -connect a1b2c3d4.iot.us-east-1.amazonaws.com:8883 \
  -cert device.pem -certform PEM
Issue: Greengrass Fails to Start with PKCS#11
Symptoms: Greengrass logs show PKCS #11 errors
Causes:
- Incorrect YAML indentation in config.yaml
- Wrong PIN or key label
- Missing PKCS #11 library
Resolution:
# Validate YAML syntax
python3 -c "import yaml; yaml.safe_load(open('/greengrass/v2/config/config.yaml'))"

# Verify key exists
pkcs11-tool --module /usr/lib/x86_64-linux-gnu/pkcs11/libtpm2_pkcs11.so \
  --list-objects

# Check Greengrass logs
sudo tail -n 200 /greengrass/v2/logs/greengrass.log
Issue: The desired action cannot be performed because an appropriate user is not logged in
40370C07BA7E0000:error:40000101:pkcs11:p11prov_VerifyInit:The desired action cannot be performed because an appropriate user is not logged in:interface.gen.c:737:Error returned by C_VerifyInit
Symptoms: openssl operation failed
Causes:
- Incorrect / missing PIN value
- openssl provider was not loaded
Resolution:
- make sure you passed all provider
- openssl … -provider pkcs11 -provider tpm2 -provider default
- make sure you passed correct pin value
- make sure the PKCS11_PROVIDER_MODULE environment variable is in place and points to existing location of PKCS#11 implementation library
General advice
When using sudo command make sure your environment variables are propagated by adding sudo -E parameter or explicitly setting the variable before executing command.
- PKCS11_PROVIDER_MODULE=… sudo …
View logs of tools
pkcs11-tool
OPENSC_DEBUG environment variable can be used to change log level of pkcs11-tool.
The default value is 0 which means no logging. The most verbose is 9.
OPENSC_DEBUG=9 pkcs11-tool --show-info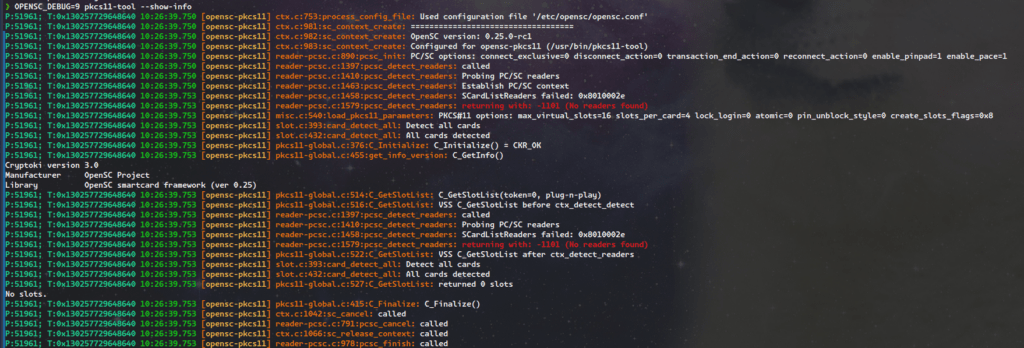
By default the output is printed to stdout and sdterr. It is possible to configure output to file using opensc configuration file /etc/opensc/opensc.conf
cat /etc/opensc/opensc.conf
app default {
       debug = 9;
       debug_file = opensc-debug.txt;
}
SoftHSM 2
Logs of SoftHSM 2 library are printed to sysslog. On ubuntu 24.04 it is /var/log
AWS Greengrass Nucleus MQTT logs
AWS Greengrass uses awscrt MQTT client. Since AWS Greengrass nucleus is java application, the logging can be configured using java command line arguments.
java ... -jar /opt/greengrass/lib/Greengrass.jar \
  -Daws.crt.log.destination=File \
  -Daws.crt.log.filename=/tmp/aws_log.log \
  -Daws.crt.lo
g.level=Debug
Conclusion: From Development to Production: A Complete Security Stack
The Journey is Complete:
We began this three-part series with a fundamental question: How do you build IoT systems where device identity and cryptographic operations are verifiable, scalable, and rooted in hardware rather than easily compromised software? Across three articles, we’ve answered that question completely.
What We’ve Accomplished:
Part 1 – The Foundation: We established why hardware security matters and how TPM 2.0, HSM, and PKCS #11 work together to create verifiable trust. You learned the architecture behind device-level identity anchoring, enterprise key management, and vendor-neutral cryptographic interfaces.
Part 2 – The Infrastructure: We built complete development and production environments that prove PKCS #11 abstraction enables identical code to operate across SoftHSM and TPM hardware. You configured the entire toolchain and verified that cryptographic operations work identically in both environments.
Part 3 – The Implementation: Here, we’ve delivered the complete production solution:
- Certificate Provisioning: Hardware-backed CSR generation that never exposes private keys
- Secure Communication: mTLS MQTT connections to AWS IoT Core using TPM-protected credentials
- Enterprise Integration: AWS IoT Greengrass configured with PKCS #11 for device identity
- Security Verification: End-to-end validation that private keys remain within hardware boundaries
- Operational Readiness: Comprehensive troubleshooting guidance for real-world deployments
The Technical Achievement: You now have a working system where:
- Device private keys exist only in TPM hardware and cannot be exported
- Certificate provisioning occurs through CSRs, maintaining key isolation
- TLS handshakes leverage hardware cryptography transparently
- The same Python MQTT client code runs unchanged in development (SoftHSM) and production (TPM)
- AWS IoT Greengrass authenticates using hardware-rooted device identity
- Complete audit trails track every cryptographic operation
The Business Value: This architecture delivers measurable benefits:
For Development: Rapid iteration without physical hardware, confident deployment with proven code paths, and simplified testing across the entire stack
For Security: Cryptographically verifiable device identity, hardware-protected keys that survive system compromise, and compliance-ready audit trails
For Operations: Configuration-based environment switching, automated certificate lifecycle management, and consistent security posture across thousands of devices
The Universal Pattern:
The approach we’ve demonstrated extends far beyond AWS IoT Core. The same PKCS #11 abstraction layer works with:
- Azure IoT Hub and Device Provisioning Service
- Google Cloud IoT Core
- Private MQTT brokers with certificate authentication
- Any system requiring hardware-backed mTLS
By anchoring trust in standardized hardware interfaces, you’ve built a portable security architecture that isn’t locked to any single cloud provider or cryptographic vendor.
The Paradigm Shift:
Traditional IoT security treated hardware modules as specialized components requiring custom integration. This series has demonstrated a different approach: treat hardware security as a first-class abstraction layer, just like you would treat database access or logging. PKCS #11 makes cryptographic hardware as portable and accessible as any other infrastructure component.
Final Thoughts:
The complete workflow, from generating keys in SoftHSM during development, to provisioning certificates through CSRs, to establishing mTLS connections with TPM-backed credentials, to running production Greengrass workloads, proves that hardware security and development agility aren’t just compatible, they’re complementary. The upfront investment in proper abstraction pays dividends in faster development, fewer bugs, stronger security, and simpler operations.
You now possess both the conceptual understanding and practical implementation skills to build IoT systems where trust isn’t just assumed, it’s cryptographically verified, hardware-protected, and auditable at every layer of the stack.
Additional Resources
Implementation Tools:
- opensc, Open source smart card tools and middleware
- tpm2-tools, TPM 2.0 command-line utilities
- tpm2-pkcs11, PKCS #11 interface for TPM 2.0
- SoftHSM, Software HSM for development
- OpenSSL 3 PKCS #11 Provider
AWS Documentation:
Standards:
Related Articles:
- Hardware-Rooted Trust- Part 1: Foundations of Hardware Security
- Hardware-Rooted Trust-Part 2: Environment Setup and Configuration
By Mohammad Shirazi, Portfolio Manager, Klika Tech and Maxim Maltsev, Edge Computing Solution Architect, Klika Tech